Introduction
Marc Bleron’s ExcelGen package version 3 has added multi-table sheets, merged cells, and writing to individual cells. This allows us to construct workbooks with sheets that have multiple-row column headers. The business users I support are happy about that!
This article walks through an example of constructing a spreadsheet with a banner title, multiple-row column headers, automatic filtering, plus frozen rows and columns. We also set font and background colors in a fairly tame way, but it demonstrates the tools we have to make an attractive end product.
See the manual page at the above link to ExcelGen on github to get an idea of how this all works. Refer back to it as we walk through the example if you have questions.
Walking Through an Example
Here is an image of the spreadsheet we will produce.
| Figure 1 - Multi-Row Spreadsheet Headers |
|---|
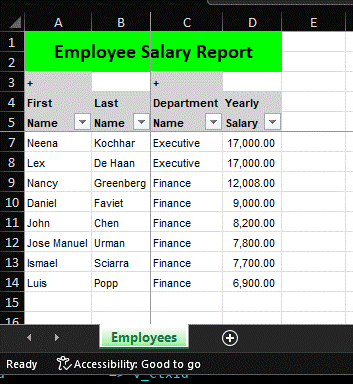 |
The ‘+’ characters and NULLs in the first header row are to demonstrate a peculiarity of ExcelGen. You will notice in the image above that even though we told the tool to make the columns in our mini-table have a light gray background, the cells that did not have any content, did not get the background style applied. I opened an issue and expect it will be addressed in the next release.
The declared variables can be thought of as object handles to various parts of our logical spreadsheet. The values are returned by functions we call to create/declare those parts. In practice they are indexes into package global collections, but we do not need to know that.
DECLARE
    v_ctxId             ExcelGen.ctxHandle;
    v_sheetId           ExcelGen.sheetHandle;
    v_tableId           ExcelGen.tableHandle;
    v_headerTableId     ExcelGen.tableHandle;
    v_headerCellStyle   ExcelGen.cellStyleHandle;
    v_cellStyle         ExcelGen.cellStyleHandle;
    -- discussed below. There are other ways to accomplish this
    v_arr_headers       arr_arr_varchar2_udt := app_csv_pkg.split_clob_to_fields(
q'{+,,+,
First,Last,Department,Yearly
Name,Name,Name,Salary}'
                                                );
We want to use a small font for the report and for the report header to have bold text on a light gray background. To get started we create our workbook and two style handles we can assign as needed. You can use CSS syntax for styles, but I’m sticking with the familiar style construction from ExcelGen version 2 for now.
BEGIN
    -- create a workbook and some initial styles to use in assignments
    v_ctxId := ExcelGen.createContext;

    -- style to use for header cells
    v_headerCellStyle := ExcelGen.makeCellStyle(
        p_ctxId => v_ctxId
        ,p_font => ExcelGen.makeFont('Arial',8,p_b => TRUE)
        ,p_fill => ExcelGen.makePatternFill('solid','lightgray')
    );
    -- style to use inside the report proper
    v_cellStyle := ExcelGen.makeCellStyle(
        p_ctxId => v_ctxId
        ,p_font => ExcelGen.makeFont('Arial',8)
    );
Next we will create our first (and only) workbook sheet with the sheet name of ‘Employees’. We’ll give the tab a color just because we can (I don’t normally). Then we put a text value into the A1 cell of the sheet. This will be our report title banner at the top of the sheet.
We create another style for this cell on the fly that will automatically apply to the cells we merge together with A1 in a moment.
    -- add a sheet to the workbook
    v_sheetId := ExcelGen.addSheet(
        p_ctxId             => v_ctxId
        ,p_sheetName        => 'Employees'
        ,p_tabColor         => 'lime'
    );

   -- place banner text in top left corner cell
    ExcelGen.putStringCell(
        p_ctxId             => v_ctxId
        ,p_sheetId          => v_sheetId
        ,p_rowIdx           => 1
        ,p_colIdx           => 1
        ,p_value            => 'Employee Salary Report'
        ,p_style            => ExcelGen.makeCellStyle(
                                    p_ctxId => v_ctxId
                                    ,p_font => ExcelGen.makeFont('Calibri',15,p_b => TRUE)
                                    ,p_fill => ExcelGen.makePatternFill('solid','lime')
                                    ,p_alignment => ExcelGen.makeAlignment(
                                        p_horizontal    => 'center'
                                        ,p_vertical     => 'center'
                                    )
                                )
    );
So far that is just in a single cell. We want to make it span across the top two rows of the report, centered. We could span a single row of cells and set the height of that row, but will merge across two rows here instead. We could get fancy and figure out the range from a number of rows and perhaps the number of columns in our header collection, but the water is muddy enough for now.
    ExcelGen.mergeCells(
        p_ctxId             => v_ctxId
        ,p_sheetId          => v_sheetId
        ,p_range            => 'A1:D2'
    );
Next, we want to create the first two rows of our column headers. We do not put our last row of the column headers here as they must be handled separately. We could use putStringCell again to do this, but I have a plan for extending the functionality of multi-row column header handling we’ll get to when we refactor. Therefor, we will create a cursor that returns our column headers as data (but only the first 2 rows of header, not the last), and add that as a table to our worksheet.
The task of generating a cursor from generic two dimensional collection object turned out to be harder than I expected. I covered it in Create a PL/SQL Cursor from a Nested Table of Nested Tables. If you are not ready to install package app_csv_pkg from my github repository, that article shows other ways you can do it.
You will notice that our anchor is one based. It can be confusing that absolute anchors are one based while relative anchors are zero based. I do not think I will be the last person to stumble and make mistakes with this.
We assign a style to the columns of our little 2 row table as well. Notice that we are using a style we call a header style for the data of this table. The table contains data we want to appear as column headers.
    v_headerTableId := ExcelGen.addTable(
        p_ctxId             => v_ctxId
        ,p_sheetId          => v_sheetId
        ,p_rc               => app_csv_pkg.get_cursor_from_collections(
                                    p_arr_arr       => v_arr_headers
                                    ,p_trim_rows    => 1 -- do not include last row of headers
                               )
        ,p_anchorColOffset => 1  -- we start in column 1
        ,p_anchorRowOffset => 3  -- leave 2 rows of room for our banner. we start in row 3
    );
    FOR i IN 1..4
    LOOP
        ExcelGen.setTableColumnProperties(
            p_ctxId         => v_ctxId
            , p_sheetId     => v_sheetId
            , p_tableId     => v_headerTableId
            , p_columnId    => i
            , p_style       => v_headerCellStyle
        );
    END LOOP;
Next, we add our real query to the sheet as a second table beneath the two row header table. We use relative positioning for the location of this table. The concepts of the anchor and relative positioning are covered well in the documentation. There is a nice picture with examples. I have gone back to it frequently when building this and other multi-table sheets and/or positioning of putCell calls. The zero based vs one based anchors and thinking in terms of whether you are operating at the sheet level or the table level can be a challenge.
    v_tableId := ExcelGen.addTable(
        p_ctxId             => v_ctxId
        ,p_sheetId          => v_sheetId
        ,p_query            =>
q'{SELECT first_name, last_name, department_name , salary
FROM hr.employees e
INNER JOIN hr.departments d
    ON d.department_id = e.department_id
        AND department_name IN ('Finance', 'Executive')
ORDER BY salary DESC}'
        ,p_anchorTableId    => v_headerTableId
        ,p_anchorPosition   => ExcelGen.BOTTOM_LEFT
        ,p_anchorColOffset  => 0
        ,p_anchorRowOffset  => 1
    );
For our data table we want to set the header that goes with the data. We could have simply put the third header row in the table we constructed above, but if we did that we could not turn on autoFilter. It seems best to tell Excel that this is a header even if you do not need autoFilter.
We then override the column header values from what was in the query. You could have made the query column aliases do what you needed here and only had to set the column style properties, but this demonstrates how the query column aliases can be ignored.
Let me point out that setTableColumnProperties allows us to set the value of the column header, but the style we are applying is to this column in the data rows, not the header. The header style is determined in the call to setTableHeader.
The mixing of concepts between column header and column data in this function is unfortunate, but probably not worth making separate methods. Technically, it all applies to a table column and the distinction in styles between header and data is a subdivision of table column properties.
    ExcelGen.setTableHeader(
        p_ctxId             => v_ctxId
        ,p_sheetId          => v_sheetId
        ,p_tableId          => v_tableId
        ,p_style            => v_headerCellStyle
        ,p_autoFilter       => TRUE
    );
    FOR i in 1..4
    LOOP
        ExcelGen.setTableColumnProperties(
            p_ctxId         => v_ctxId
            ,p_sheetId      => v_sheetId
            ,p_tableId      => v_tableId
            ,p_columnId     => i
            ,p_style        => v_cellStyle
            -- override the column header from query column aliases
            ,p_columnName   => v_arr_headers(3)(i)
        );
    END LOOP;
We need to set the number format for the fourth data column, Salary. We could have created a style that included the number format and selectively used it with setTableColumnProperties above.
So far I’ve been choosing to set the date, timestamp and number formats separately from the the styles.
Since setColumnFormat operates at the sheet level it applies to the header rows too, but since those values are strings and not numbers, it doesn’t matter.
    -- This is at the sheet level
    ExcelGen.setColumnFormat(
        p_ctxId             => v_ctxId
        ,p_sheetId          => v_sheetId
        ,p_columnId         => 4
        ,p_format           => '#,##0.00_);(#,##0.00)' -- an accounting number style
    );
Next we want to freeze our column headers and the first two columns of data (the first and last name values). In this example freezing the first two columns is not very useful since the total number of columns is so small, but it is instructive to see how it is done.
Specifying the top left corner of the region that is allowed to scroll is what Excel does too, but we typically think in terms of which columns and rows are frozen. Too bad. We need to specify where the scrollable active pane starts.
The row we make top of the scrollable region is the first one with data – two rows for the banner, three rows of header, so row six is first row of data. Column 3 is the first one we want in the scrollable pane.
    -- freeze row headers and first two columns (aka setting active pane)
    ExcelGen.setSheetProperties(
        p_ctxId             => v_ctxId
        ,p_sheetId          => v_sheetId
        ,p_activePaneAnchorRef => ExcelGen.makeCellRef(
            p_colIdx            => 3
            ,p_rowIdx           => 6
        )
    );
We are done declaring the content of the sheet. We finish by executing everything to create the workbook file and clean up after ourselves with the closeContext.
    --  ExcelGen.createFile(ctx, 'TEST_DIR', 'multi-row-header.xlsx');
    ExcelGen.createFile(v_ctxId, 'TMP_DIR', 'multi-row-header.xlsx');
    ExcelGen.closeContext(v_ctxId);

END;
/
You saw the output spreadsheet at the top of the article.
Conclusion
This journey through creating a spreadsheet touches on both the nuts and bolts of general spreadsheet creation with ExcelGen and also now some bells and whistles with a banner and multi-row column headers.
It is a lot of code though. I intend to refactor into a reusable utility procedure for multi-row column headers. I was going to cover that utility in another article. I wound up doing the work for an employer on their dime, so it isn’t mine to share. If you have read this far, I’m sure you could create your own given the pattern shown here.
Appendix - Full Code Listing
DECLARE
    v_ctxId             ExcelGen.ctxHandle;
    v_sheetId           ExcelGen.sheetHandle;
    v_tableId           ExcelGen.tableHandle;
    v_headerTableId     ExcelGen.tableHandle;
    v_headerCellStyle   ExcelGen.cellStyleHandle;
    v_cellStyle         ExcelGen.cellStyleHandle;
    v_arr_headers       arr_arr_varchar2_udt := app_csv_pkg.split_clob_to_fields(
q'{+,,+,
First,Last,Department,Yearly
Name,Name,Name,Salary}'
                                                );
BEGIN
    -- create a workbook and some initial styles to use in assignments
    v_ctxId := ExcelGen.createContext;
    v_headerCellStyle := ExcelGen.makeCellStyle(
        p_ctxId => v_ctxId
        ,p_font => ExcelGen.makeFont('Arial',8,p_b => TRUE)
        ,p_fill => ExcelGen.makePatternFill('solid','lightgray')
    );
    v_cellStyle := ExcelGen.makeCellStyle(
        p_ctxId => v_ctxId
        ,p_font => ExcelGen.makeFont('Arial',8)
    );

    -- add a sheet to the workbook
    v_sheetId := ExcelGen.addSheet(
        p_ctxId             => v_ctxId
        ,p_sheetName        => 'Employees'
        ,p_tabColor         => 'lime'
    );
    -- place banner text in top left corner cell
    ExcelGen.putStringCell(
        p_ctxId             => v_ctxId
        ,p_sheetId          => v_sheetId
        ,p_rowIdx           => 1
        ,p_colIdx           => 1
        ,p_value            => 'Employee Salary Report'
        ,p_style            => ExcelGen.makeCellStyle(
                                    p_ctxId => v_ctxId
                                    ,p_font => ExcelGen.makeFont('Calibri',15,p_b => TRUE)
                                    ,p_fill => ExcelGen.makePatternFill('solid','lime')
                                    ,p_alignment => ExcelGen.makeAlignment(
                                        p_horizontal    => 'center'
                                        ,p_vertical     => 'center'
                                    )
                                )
    );
    ExcelGen.mergeCells(
        p_ctxId             => v_ctxId
        ,p_sheetId          => v_sheetId
        ,p_range            => 'A1:D2'
    );


    v_headerTableId := ExcelGen.addTable(
        p_ctxId             => v_ctxId
        ,p_sheetId          =>  v_sheetId
        ,p_rc               => app_csv_pkg.get_cursor_from_collections(
                                    p_arr_arr       => v_arr_headers
                                    ,p_trim_rows    => 1 -- do not include last row of headers
                               )
        ,p_anchorColOffset => 1
        ,p_anchorRowOffset => 3  -- leave room for our banner
    );
    FOR i IN 1..4
    LOOP
        ExcelGen.setTableColumnProperties(
            p_ctxId         => v_ctxId
            , p_sheetId     => v_sheetId
            , p_tableId     => v_headerTableId
            , p_columnId    => i
            , p_style       => v_headerCellStyle
        );
    END LOOP;

    v_tableId := ExcelGen.addTable(
        p_ctxId             => v_ctxId
        ,p_sheetId          => v_sheetId
        ,p_query            =>
q'{SELECT first_name, last_name, department_name , salary
FROM hr.employees e
INNER JOIN hr.departments d
    ON d.department_id = e.department_id
        AND department_name IN ('Finance', 'Executive')
ORDER BY salary DESC}'
        ,p_anchorTableId    => v_headerTableId
        ,p_anchorPosition   => ExcelGen.BOTTOM_LEFT
        ,p_anchorColOffset  => 0
        ,p_anchorRowOffset  => 1
    );

    ExcelGen.setTableHeader(
        p_ctxId             => v_ctxId
        ,p_sheetId          => v_sheetId
        ,p_tableId          => v_tableId
        ,p_style            => v_headerCellStyle
        ,p_autoFilter       => TRUE
    );
    FOR i in 1..4
    LOOP
        ExcelGen.setTableColumnProperties(
            p_ctxId         => v_ctxId
            ,p_sheetId      => v_sheetId
            ,p_tableId      => v_tableId
            ,p_columnId     => i
            ,p_style        => v_cellStyle
            -- override the column header from query column aliases
            ,p_columnName   => v_arr_headers(3)(i)
        );
    END LOOP;

    -- This is at the sheet level
    ExcelGen.setColumnFormat(
        p_ctxId             => v_ctxId
        ,p_sheetId          => v_sheetId
        ,p_columnId         => 4
        ,p_format           => '#,##0.00_);(#,##0.00)' -- an accounting number style
    );

    -- freeze row headers and first two columns (aka setting active pane)
    ExcelGen.setSheetProperties(
        p_ctxId             => v_ctxId
        ,p_sheetId          => v_sheetId
        ,p_activePaneAnchorRef => ExcelGen.makeCellRef(
            p_colIdx            => 3
            ,p_rowIdx           => 6
        )
    );

    --  ExcelGen.createFile(ctx, 'TEST_DIR', 'multi-row-header.xlsx');
    ExcelGen.createFile(v_ctxId, 'TMP_DIR', 'multi-row-header.xlsx');
    ExcelGen.closeContext(v_ctxId);

END;
/